🔒 TempSend

Practical Use Cases & Step-by-Step Guides

How to Use TempSend

Discover practical ways to use TempSend for secure, temporary file sharing. Each guide includes step-by-step instructions to help you transfer files quickly and privately.

📱 Transfer Photos & Videos from iPhone to Android

Easily transfer photos, videos, and files between iPhone and Android devices without cables, third-party apps, or cloud services. Perfect for switching phones or sharing media with friends.

1
Create a Secure Room
On your iPhone, open Safari and visit tempsend.org. Click the "Create Room" button. Choose how long you need the files to be available (5 minutes to 12 hours). You can also add a password for extra security.
TempSend homepage showing Create Room button and expiry options
2
Customize Your Room Name (Optional)
Click on the room title at the top to rename it. Give it a meaningful name like "iPhone Photos" or "Trip Photos" to help you remember what's inside. This makes it easier to organize multiple rooms.
💡 Pro Tip
Room names are only visible to people who have access to the room. They don't appear in the URL, keeping your room private.
3
Upload Your Photos and Videos
Once the room is created, you'll see an upload area. Tap "Choose Files" or drag and drop your photos and videos. You can select multiple files at once from your iPhone's photo library. Files are automatically encrypted in your browser before uploading.
Room page showing the file upload area with Choose Files button
4
Open the Share Menu
After uploading, look for the Share button (📤) in the top-left corner of the room. Tap it to open the share menu. This is where most users miss the QR code feature!
Room interface highlighting the Share button in top-left corner (room settings are in top-right)
5
Display the QR Code
In the share menu, tap "QR Code". A large QR code will appear on your iPhone screen. This QR code contains the encrypted link to your room.
QR code modal displaying on screen with Scan QR Code title
6
Scan with Your Android Device
On your Android phone, open the Camera app or any QR code scanner. Point it at the QR code on your iPhone screen. Tap the notification that appears to open the room link in your browser.
💡 Pro Tip
Most modern Android phones can scan QR codes directly from the camera app without needing a separate scanner app. Just open Camera and point it at the QR code.
7
Download Files on Android
Your Android browser will open the room, showing all the files you uploaded from your iPhone. Tap any photo or video to view it, or use the download buttons to save them to your Android device. Files are decrypted automatically in your browser.
Room gallery view showing uploaded files with thumbnails and download options
🔐 Privacy Note: All files are encrypted end-to-end. Your photos and videos are encrypted on your iPhone before upload, and only devices with the QR code link can decrypt them. The files automatically delete after your chosen expiry time.

📄 Quick Document Sharing Between Devices

Share documents, PDFs, or presentations between your laptop and phone instantly. Perfect for reviewing documents on mobile, printing from another device, or quick file transfers.

1
Create Room on Your Laptop
Visit tempsend.org on your laptop/desktop browser. Click "Create Room" and select an appropriate expiry time. For quick transfers, 5-15 minutes is usually sufficient.
2
Upload Your Documents
Drag and drop your documents into the room, or click "Choose Files" to browse. You can upload multiple files at once - PDFs, Word documents, Excel spreadsheets, PowerPoint presentations, and more.
3
Access on Your Phone
Option A: Click the Share button (📤) and select "QR Code", then scan it with your phone's camera.

Option B: Click "Copy Link" in the share menu and send it to yourself via email, message, or any other method.
4
View or Download on Mobile
Open the link on your phone to access all documents. View them in your browser or download them to your device. Files remain available until the expiry time.
⚡ Speed Tip: Bookmark the TempSend homepage on both devices for instant access whenever you need to transfer files quickly.

👥 Share Files with a Team or Group

Share multiple files with colleagues, classmates, or friends using a single link. Perfect for group projects, event photos, or collaborative work.

1
Create a Password-Protected Room
Visit tempsend.org and click "Create Room". Toggle on "Password Protected" and enter a password. Choose an expiry time that works for your team (1-12 hours for longer collaborations).
🔒 Security Feature
Password protection adds an extra layer of security. Even if someone intercepts the room link, they cannot access files without the password.
2
Upload All Project Files
Upload all files your team needs - documents, images, videos, spreadsheets, etc. You can upload up to 50 files per room. Team members can also add their own files to the same room.
3
Share the Room Link and Password
Click the Share button (📤) and copy the room link. Share it with your team via email, Slack, Discord, or any messaging platform. Make sure to also share the password (preferably through a different channel for better security).
4
Collaborate and Download
Team members open the link, enter the password, and access all shared files. Everyone can view, download, and even upload additional files. The built-in chat feature lets you discuss files in real-time.
💬 Bonus Feature: Use the encrypted chat feature in the room to discuss files with your team. All messages are end-to-end encrypted and automatically deleted when the room expires.

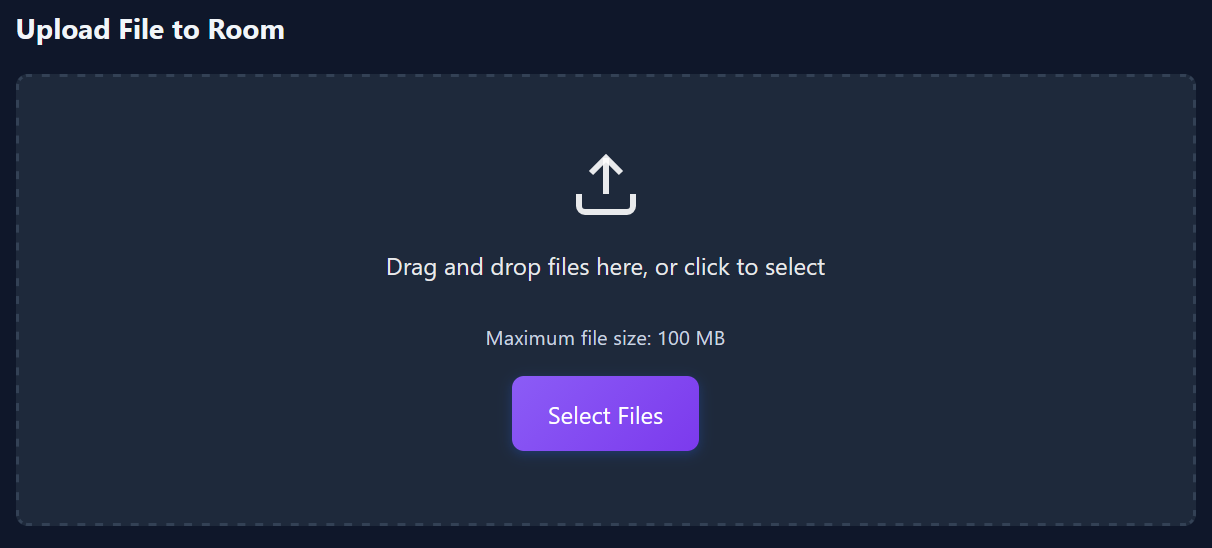
📧 Send Large Files That Exceed Email Limits

Email providers typically limit attachments to 25MB or less. Use TempSend to share larger files like videos, high-resolution photos, design files, or software packages.

1
Create a Room for Your Files
Visit tempsend.org and create a room. For professional file sharing, consider using a longer expiry time (6-12 hours) to ensure recipients have time to download.
2
Upload Large Files
Upload your large files - videos, RAW photos, ZIP archives, design files, etc. TempSend can handle files that are too large for email. Files are compressed and encrypted automatically.
📦 File Types Supported
TempSend supports all file types: videos (MP4, MOV, AVI), archives (ZIP, RAR), documents (PDF, DOCX), images (JPG, PNG, RAW), design files (PSD, AI), and more.
3
Copy and Share the Link
Click the Share button (📤), then "Copy Link". Paste this link in your email to the recipient. Include a brief note explaining what files they'll find.
4
Recipient Downloads Files
Recipients click the link in your email, view the files in their browser, and download what they need. No account creation or app installation required on their end.
🌟 Professional Use: TempSend is perfect for client deliverables, contractor file sharing, or sending portfolio samples. The automatic expiry ensures files don't remain online indefinitely.

💻 Temporary File Storage for Multi-Device Work

Working across multiple devices? Use TempSend as temporary storage to access files from your laptop, phone, tablet, or work computer without permanent cloud storage.

1
Create a Long-Term Room
Create a room with a 12-hour expiry if you'll be working throughout the day. Add a password if you're working in a public space or on shared networks.
2
Upload Work Files
Upload files you need to access across devices - work documents, presentations, reference materials, code files, design mockups, etc.
3
Access from Any Device
Bookmark the room link or keep the browser tab open on each device. You can access and download files from your laptop, work computer, tablet, or phone throughout the day.
🔄 Real-Time Updates
Files uploaded from one device instantly appear on all other devices viewing the room. No manual syncing required.
4
Automatic Cleanup
After your work session ends, files automatically delete after the expiry time. No manual cleanup needed, and no files left behind on cloud servers.
🔐 Privacy Advantage: Unlike permanent cloud storage, TempSend automatically deletes files after use. Perfect for sensitive work files or when you don't want long-term storage.

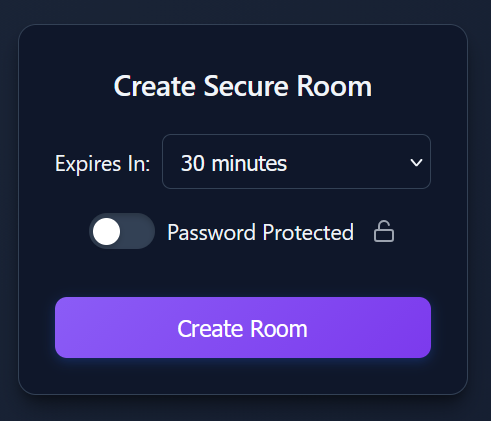
General Tips for Using TempSend

🎯 Choose the Right Expiry Time
For quick transfers (same location): 5-15 minutes
For sharing with friends: 30 minutes - 1 hour
For team collaboration: 6-12 hours
Files automatically delete after expiry, so choose enough time for recipients to download.
🔒 Use Password Protection for Sensitive Files
Enable password protection when sharing sensitive documents, financial files, or personal photos. Share the password through a different channel than the link for better security.
📱 QR Codes Work Best for Same-Location Transfers
When you're physically near the device you're transferring to (like iPhone to Android), QR codes are the fastest method. No typing or copy-pasting required!
⚡ Upload Multiple Files at Once
Select multiple files when uploading to save time. You can upload up to 50 files per room, making it easy to share entire photo albums or project folders.
🌐 Works on All Devices and Platforms
TempSend works on any modern browser - iPhone (Safari), Android (Chrome), Windows, macOS, Linux. No app installation required, making it truly cross-platform.
⚙️ Room Controls Overview
Top-left: Share button (📤) for copying links, generating QR codes, and viewing room codes
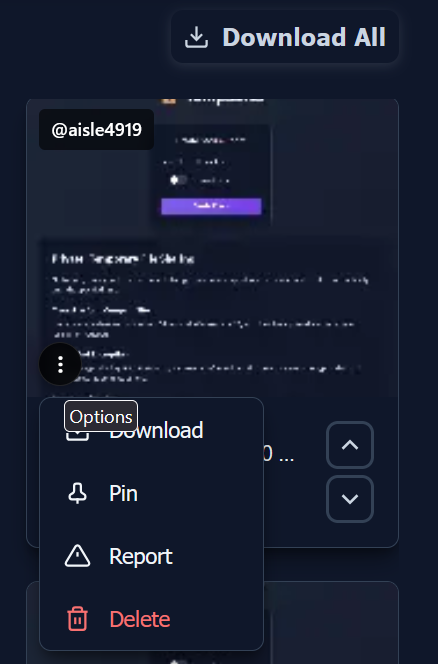
Top-right: Room settings (⚙️) for managing room options
Top-center: Click the room title to rename your room

Ready to Start Sharing?

Try TempSend now - no account required, completely free, and fully encrypted.

Create Your First Room

Learn More

📖 How TempSend Works → 🔐 Privacy Policy → 📋 Terms of Service →